Building a Simple HTTP Server with Express.js in Node.js [Docker + Jest.js]
“ Programming isn’t about what you know; it’s about what you can figure out. ” — Chris Pine
![Building a Simple HTTP Server with Express.js in Node.js [Docker + Jest.js]](https://miro.medium.com/v2/resize:fit:1200/1*Uk1_JpkkyKg9sDMCejJLkw.jpeg)
Building a scalable HTTP server is almost a basic requirement on modern web development.
In this project, we dive into creating a simple HTTP webserver using Express.js in Node.js. We incorporate Docker for containerization and Jest.js for testing the code, among other things.
Packages that I used;
- Express.js = Web Framework
- express-basic-auth = Basic Auth pages
- http-auth = Basic Auth pages
- swagger- autogen swagger-jsdoc swagger-ui-express = Creating Swagger Page Automatically
- urllib = Send requests for testing
- jest = dev dependencies, Test library
- nodemon = dev dependencies, restart the project if file(s) changed
Building a project is easy; anyone can write code. The important part is that your code should be readable and clean.
“ Any fool can write code that a computer can understand. Good programmers write code that humans can understand. ” — Martin Fowler
I tried to write this code in a readable manner, so I avoided shortening some methods or using shortcuts.
The purpose of this project is to create a web server that can receive requests and return responses. It includes support for all common HTTP methods and authentication methods for internal usage. Throughout the development process, I learned new things about Node.js and Express.js, such as testing the code and containerization usingDocker.
Lets dive in the project!
GitHub Repo: batuhan-bulut/simple-http-server (github.com)
DockerHub: bulutbatuhan/simple-server — Docker Image | Docker Hub
Project Tree
I tried to keep the project tidy and as small as possible.
.
├── routes/
│   ├── auth.js
│   ├── customResponses.js
│   ├── methods.js
│   └── reqInspection.js
├── tests/
│   ├── auth.test.js
│   ├── customResponses.test.js
│   ├── methods.test.js
│   └── reqInspection.test.js
├── Dockerfile
├── index.js
├── logger.js
├── swagger_output.json
└── swagger.js
routes folder : holds the routes and business logics for the endpoints.
tests folder : holds the tests.
Dockerfile : This file explain about how to create this project as docker image.
index.js : Entry point to the app.
logger.js : print as console.log, can be extended like write to a file, different log modes, etc.
swagger.js : Requirement for create swagger UI automatically.
swagger_output.json : Swagger UI details.
Heart of the application, index.js
const express = require('express')
const app = express()
const port = 3000

const swaggerUi = require('swagger-ui-express')
const swaggerFile = require('./swagger_output.json')

const logger = require('./logger')
const authRouter =  require('./routes/auth')
const methodRouter = require("./routes/methods")
const customRouter = require("./routes/customResponses")
const reqRouter = require("./routes/reqInspection")
At the beginning of the file, we set up our app and set the port to 3000. We create swaggerUiand swaggerFileto set up our Swagger UI. We also include a loggerfor logging purposes. Lastly, we declare our routesto handle client requests.
// Simple console logger middleware
app.use((req, res, next) => {
  logger.info(`${req.method} | ${req.url}`)
  next()
})
I added loggeras middleware(middleware means executed if path matches, I don’t have path here. It means it will executed in every request).
// Error Handling
app.use(function (err, req, res, next) {
  console.error(err.stack)
  res.status(500).send('Something broke!')
})
A small Error handling if something crashes, just in case :)
app.use("/methods", methodRouter)
app.use("/auth", authRouter)
app.use("/custom", customRouter)
app.use("/req", reqRouter)
app.use('/docs', swaggerUi.serve, swaggerUi.setup(swaggerFile))

app.all('*', function(req, res){
  res.redirect("../docs")
});
We route our requests to endpoints.
In the first line if a request hits /methods endpoint, it will routed to methodRouter (./routes/methods).
And finally, with app.all I catcth every other request and redirect to my main page.
// Main app
app.listen(port, () => {
  logger.info(`Server listening on http://localhost:${port}`)
})
And start my app. Because of that index.js is my entrypoint to the server.
Maps of the server, routes!
Without routing, our index.js file would become very complex and it could be difficult to decouple later. By separating the endpoints into different files, we can manage them more easily. This allows us to handle different endpoints with different libraries if needed. As a result, our code looks cleaner and simpler.
Let’s dive in to auth.js for example:
const express = require('express')
const router = express.Router()
const basicAuth = require('express-basic-auth') // Basic Auth
const auth = require('http-auth') // Digest Auth

const utils = require("./../node_modules/http-auth/src/auth/utils")
const logger = require('./../logger')
let creds
We declare our variables at the beginning of the file.
// Basic Auth
router.use("/basicAuth/:user/:pass", (req, res, next) => {
    creds = {
        basic: {
            user: req.params.user,
            pass: req.params.pass
        }
    },
        next()
})
I’m using middleware in “/basicAuth/:user/:pass” endpoint. :user or :pass means I can reach them in code with req.params.
I parse the userand passfrom URL and store them in creds.basic. We will use them during the authentication part.
After that, next() function is called to pass control to the next middleware or route handler.
router.use("/basicAuth/:user/:pass", basicAuth({
    authorizer: myAuthorizer,
    unauthorizedResponse: getUnauthorizedResponse,
    //challenge: true,
})
)
On the next middleware, we check basic authentication with “express-basic-auth” package. It uses myAuthorizerfunction to validate the request, getUnauthorizedResponsefor Unauth response.
function myAuthorizer(username, password) {
    const userMatches = basicAuth.safeCompare(username, creds.basic.user)
    const passwordMatches = basicAuth.safeCompare(password, creds.basic.pass)

    return userMatches & passwordMatches
}

function getUnauthorizedResponse(req) {
    logger.info("Login Failed!")
    return req.auth
        ? ('Credentials ' + req.auth.username + ':' + req.auth.password + ' rejected')
        : 'No credentials provided'
}
The “myAuthorizer” function takes two arguments: “user” and “pass”.
Within the function, we compare these values with pre-defined values. We are using creds.basic as the pre-defined values (which we declare in a previous middleware). If the user and pass values match the pre-defined values, the function returns true.
The “getUnauthorizedResponse” takes one argument: request.
We are are using this function to return Unauth responses. We checking the req.auth property; if exists (true) we return rejected message. If not exits (false) it means there is no credentials.
router.get("/basicAuth/:user/:pass", (req, res) => {
    //
    // #swagger.tags = ['Auth']
    // #swagger.summary = 'GET request with Basic Auth'
    // #swagger.description = 'Testing basic header authentication with challenge enabled. (Keep asking until you enter correct)'
    // #swagger.responses[200] = { description: 'Auth Successful.',}
    // #swagger.responses[401] = { description: 'UnAuth Request.',}
    //
    logger.info("Login Success!")
    res.status(200).send("Auth Success!")
})
After Authentication steps we finally reach the router.get
We handle the GETmethod to /basicAuth/:user/:pass with this. And finally return 200response.
That #swagger sections for auto-generate SwaggerUI. You can check detailed information about that from here: swagger-autogen — npm (npmjs.com)
Something from our childhood, tests!
Every code, every project should have tests. Without Unit testing we cannot make sure our software works as expected after modified.
I’m using Jest library for testing,
lets check auth.test.js with examples:
const { request } = require('urllib');

test('[GET] [Auth] Basic Auth', async () => {
    options = { auth: "1:1" }
    const { _, res } = await request("http://localhost:3000/auth/basicAuth/1/1", options)
    const statusCode = res.status
    expect(statusCode).toEqual(200)

})

test('[GET] [Uauthorized] Basic Auth', async () => {
    options = { auth: "1:2" }
    const { _, res } = await request("http://localhost:3000/auth/basicAuth/1/1", options)
    const statusCode = res.status
    expect(statusCode).toEqual(401)
})
These 2 tests checking /basicAuth endpoint.
On first test, we sent a correct authentication and expect to response as 200 OK . Second test is checks “what happens if we sent incorrect credentials?”.
If these tests successfully passed, you can see something similar to this in your console: PASS tests/auth.test.js
Let’s modify tests so fail, and check what’s happening if tests fails. To do that I changed the expected status code as 302 for both enpoints.
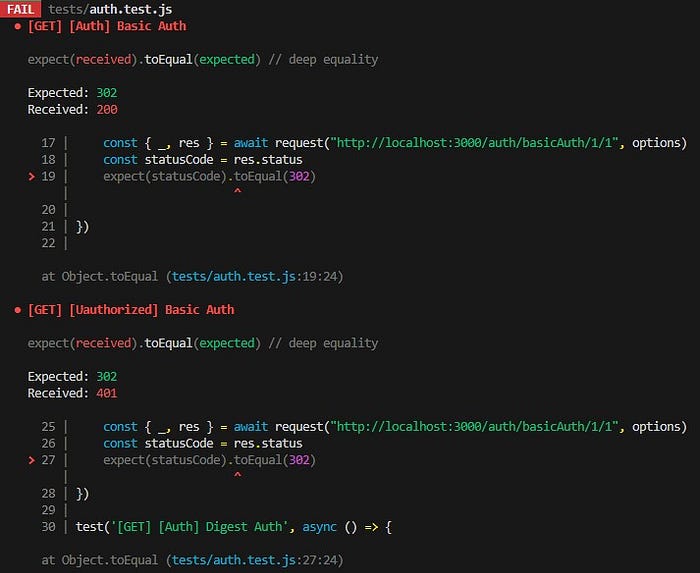
As you see tests failed, because we expected 302for both endpoints and it retuns 200 and 401 as response.
Thanks to tests we can check the code and diagnose why they are failed before we push to production.
Put everything in a box, Docker!
You can download the repo and run in your local computer.
But what if you want to run in every environment and have a more control?
Docker is a perfect solution in that workflows, you can simply seach online for more information.
Anyway; this is my Dockerfile for creating image.
FROM node:18.16.1-alpine
RUN apk --no-cache add git
WORKDIR /usr/src/app
RUN git clone https://github.com/batuhan-bulut/simple-http-server.git /usr/src/app
RUN npm install
EXPOSE 3000
CMD [ "node", "index.js" ]
FROM node:18.16.1-alpine: OS image for the container. It uses the Node.js version 18.16.1 with the Alpine Linux distribution, which provides a lightweight and efficient environment for running Node.js applications.
RUN apk --no-cache add git: This line installs Git inside the container. It uses the apk package manager (specific to Alpine-based images) to add Git as a dependency. The --no-cache flag ensures that the package index is not cached in order to keep the Docker image size smaller.
WORKDIR /usr/src/app: This sets the working directory inside the container to /usr/src/app.
RUN git clone https://github.com/batuhan-bulut/simple-http-server.git /usr/src/app: This line clones a Git repository containing the source code for a simple HTTP server into the /usr/src/app directory inside the container.
RUN npm install: This installs the project dependencies using npm. By executing this command, the dependencies specified in package.json are installed.
EXPOSE 3000: This line exposes port 3000 on the container.
CMD [ "node", "index.js" ]: This is the command that will be executed when the container starts. It specifies that the node command should run the index.js file.
In summary, this Dockerfile sets up a container based on the specified Node.js version, installs Git, clones a GitHub repository into the container, installs the project dependencies, exposes port 3000, and defines the command to start the application.
Since it’s already pushed to Docker Hub; you can pull this via:
docker pull bulutbatuhan/simple-server
Summary
Now you can deploy a web-server via Express.js, test it via Jest.js and put it in a docker image if you want with the Docker part.
You have all the basic informations to do that.
This project is not a professional build, just something I built in my free time, please reconsider this if you’re using this in live or prod environments. It’s not a %100 safe or bug-free.
Thank you for reading!